

Kubeflow on GCP
In this post I intend to address the following:
- A short intro
- A VERY brief overview of Kubeflow. Anything more and I’d just be regurgitating the shpeal on the home page or count - less - other - tutorials - and - stuff.
- First Impressions
- How to setup Kubeflow on GPU’s free trial tier
- Kubeflow Pipelines
- Kubeflow Notebooks
A Short Intro
A few months ago a person I respect recomended I look into Tensorflow Extended (TFX). Well on that journey I got side tracked into learning about Kubeflow. You can run TFX pipelines in Kubeflow so the time was not wasted.
Recently I have become more and more intersted in ML-Ops. For the uninitaited, ML-Ops is like Dev-Ops but with a particular focus on Machine Learning (ML) applications. There are two reasons ML-Ops has peaked my interest is the past year or so; Firstly, I am NOT a data scientist, nor am I a mathematisition or statistition but I work with some VERY smart people who are and when it comes to doing the data science I just can’t keep up. My background is robotics, I got into ML/AI because I wanted to make my robots smarter. Secondly, I have trouble remembering to pick up milk on the way home, never mind how to replicate an experiment I did a few weeks ago. Because of this I am a firm believer in using the right tool to make my life easier.
A VERY brief overview of Kubeflow
I shudder to regurigitate the same Kubeflow elevator pitch I’ve read a bajillion times over the past several weeks. What I want to do it show you how you can get started with Kubeflow on GCP for free, but I guess I’ll have to set the scene first.
Kubeflow attempts to house several useful features commonly required when developing and deploying large scale ML models under one roof:
- Hosted Jupyer Notebooks: Allows you to run Jupyter Notebooks using pre-baked or custom docker images.
- Artefact Storage: Kubeflow provides persistent storage to keep all your ML artefacts such as checkpoints, evaluation metrics etc.
- Kubeflow-Pipelines: Kubeflow provides a Domain Specific Language (
kfp.dsl) that helps you define Argo pipelines. These allow you to stitch multiple docker containers together into a pipelne. There are very handy functions that can even turn your single python function into a dockerized component. - Hyperparameter Optimization: Kubeflow incorporates Katib to allow Kubernetes based hyperparameter tuning and neural archetecture search.
The fact Kubeflow is Cloud Native mean scalability is built in. However, Kubeflow is not a beautifully pollished package that will solve all your ML woes. It is a collection of tools cobbled together ontop of Kubernetes. Much of the material I found on Kubeflow implies that you don’t need any Kubernetes knowledge to get started with Kubeflow. This is techically correct, but the moment you need to anything beyond the toy examples presented, dive a little deeper or try something different you probably won’t have fun unless you’re willing to dive into some Kubey goodness.
In saying that, upon undertaking this little escapade I had ZERO kube experience and within a day I had a Notebook up and running and had managed to bumble my way through my first few Kubeflow pipelines.
First Impressions
I quite like Kubeflow, from my experience it has not been too hard to get things up an running. I went into this with zero Kubernetes experience and managed to get a cluster up and running on GCP in a few hours. This included a few trips to Git Issues and Google but we got there in the end (details below).
I do feel Kubeflow is not for the new or intermediate developer. It’s for those who are realitvly sophistocated and looking to scale their work across many machines. If you’re a large organisation who does not have any internal GPU resources but you’re familiar with Kubernetes and you want to do some Deep Learning then then Jupyter Notebook Server on Kubeflow does seem like a good choice.
As for Kubeflow Pipelines, I realy like them, when they fit the task. If you’re quite early in the devlopment cycle and you’re still tweaking code ironing out bugs etc keep Kubeflow Pipelines out of it. Wait until you have a solid understanding of all steps in your pipeline. Will you be training in the pipeline? If not maybe Cortex would be more suited, the barrier to entry is MUCH lower. However, if you need Kubeflow Pipelines then they are very powerful, but you’ll probably need to build some sophistication around Kubernetes to do anything other than toy experiments.
How to setup Kubeflow on GPU’s free trial tier
Google offers a $300US trial teir. The setup is not too much different than what is outlined on the official docs but there were some issues or assumed knowledge that tripped me up. So here we go.
-
Setup a GCP account: You will need to hand over your credit card but google will not charge you without you first agreeing when the trial is up. (Update: I did end up getting a bill for about $100. A button appeared a few weeks into my trial saying something along the lines of “Upgrade” I thought it meant try these new features not we’re going to start charging you now. They were nice enough to wave the bill once I informed them of the missunderstanding through.)
- Activate The Required GCP APIs: The officail instructions to Setup a GCP Project are pretty spot-on. Just a few things that tripped me up.
-
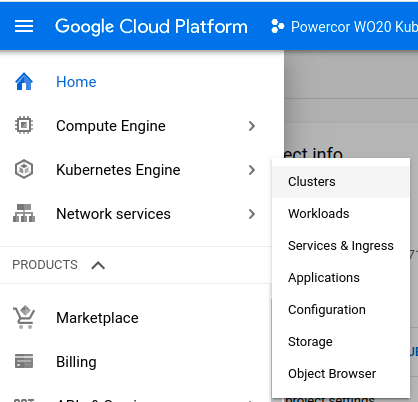
If you created the GCP project you’re most likely the owner, but if you want to check. You can find your role in the Project by navigating to
IAM & Admin > IAMon the side bar. Here you sould see a table, locate the project you just created and check the role. -
When you get to Set up OAuth for Cloud IAP If you add a logo to the OAuth consent screen you will be told that Google needs to verify the app. I did this the first time I setup OAuth and it still let me continue, it was just a point of confusion. Also, if you add a logo for some unknown reason you cannot remove it 😠 .
-
When you’re done you will need to Deploy using CLI.
-
- Deploy Using CLI: Here
- When you get there use this as the
CONFIG_URI. The one the Kubeflow docs causes me and others problems, this git issue recomends you use the one linked above. - When you get to Deploying Kubeflow. Use
kfctl build -v -f ${CONFIG_URI}instead ofkfctl apply -v -f ${CONFIG_URI}. This will create all the configurations you need without actually tellingKubectlto spin up any infrastructure. - Edit
${KF_DIR}/kfctl_gcp_iap.yamlsee the snippet below: ```yaml imports:- path: cluster.jinja resources:
- name: kubeflow
properties:
autoprovisioning-config:
enabled: true
max-accelerator:
- count: 16
type: nvidia-tesla-p4 # Check your region has this resource max-cpu: 128 max-memory: 2000 cluster-version: “1.14” cpu-pool-enable-autoscaling: true cpu-pool-initialNodeCount: 2 cpu-pool-machine-type: n1-standard-4 # Change this to n1-standard-4 or 2 cpu-pool-max-nodes: 10 cpu-pool-min-nodes: 0 enable-workload-identity: true enable_tpu: false gkeApiVersion: v1beta1 gpu-number-per-node: 1 gpu-pool-enable-autoscaling: true gpu-pool-initialNodeCount: 0 gpu-pool-machine-type: n1-standard-4 # Change this to n1-standard-4 or 2 gpu-pool-max-nodes: 4 gpu-pool-min-nodes: 0 gpu-type: nvidia-tesla-p4 # Check your region has this resource identity-namespace: xxxxxxxxxxxxxxxxxxxxxxxxxxxxxx.svc.id.goog ipName: kubeflow-deployment-ip pool-version: v1 securityConfig: masterAuthorizedNetworksConfigCidr: - cidrBlock: 1.2.3.4/32 masterAuthorizedNetworksConfigEnabled: false masterIpv4CidrBlock: 172.16.0.16/28 podSecurityPolicy: false privatecluster: false secureNodeMetadata: false users:- user:xxxxxxxxxxxxxxxxxxxxxxxxxxxxxxxxxxxxx zone: australia-southeast1-b # Change the Zone if you need to. type: cluster.jinja ```
- If/when you begin using multiple GPC accounts (ie: work/personal) you’ll need to:
- re-run the following two commands to tell
gcloudwhat account to usegcloud auth loginandgcloud auth application-default login. -
Also, to update the
kubectlcredentials you’ll need to run do the following.# This will take you through existing clusters and make you set one as default gclound init # Update ~/.kube/config with credentials of # current gcloud cluster. Where: # NAME is the cluster name. If you # can't member it you can find it at. # clound console > Kubernetes Engine > clusters # see fig below. gcloud container clusters get-credentials $NAME
This in condensed from Google Cloud docs Cluster access for kubectl.
Finding your cluster’s name.
- re-run the following two commands to tell
- When you get there use this as the
GPU Quotas
By default GCP assignes you’re new account zero gpu resources. You need to request them to increase your gpu quota. Unforunately without this knowledge the error message you get when trying to launch a GPU Notebook:
GCP Error: Quota gpus all regions exceeded limit 0.0
was a bit confsing. Something like this would be much nicer.
Yo Fam, looks like your gpu quota is set to 0 for all regions. This is to stop you accidenty spinning up a bunch of gpus accidently and Google’s big bad bean counters sending you a bill for holla dollas. You can request an increase to your quota via your GCP console.
I have not tried this with the free teir, but you can give it a crack by navigating here.
Logging
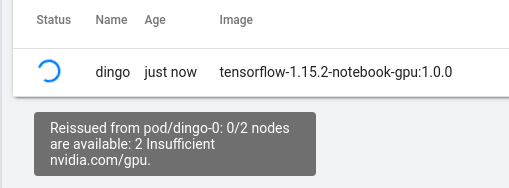
I found debugging a bit of a pain. This was no doubt amplified by my lack of Kubernetes and GCP experience. For example, when launching a new jupyter notebook server clear and visible logs would be nice rather then having to dig around in the GCP console. Mousing over the spinner when the notebook server is launching does show some information, but it’s no very helpful eg:
Launching a gpu notebook server when I dont have gpu resources. Results in the same message as when I do have gpu resources. But when I don’t have gpu resources the spinner just keeps on spinning indefinately.
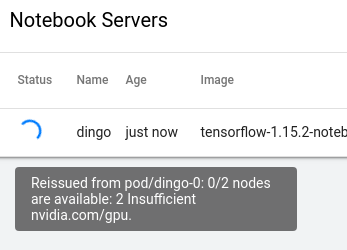
and, confusingliy …
Lauching a CPU notebook
Here are some helpful commands. (These really helped me when launching a custom Jupyter Notebook Server Container)
# get kubectl the credentils it needs to access the cluster (you should only need to run this once)
$ gcloud container clusters get-credentials <your-cluster-name> --zone=<your-cluster-zone>

# List to pods currently up
$ kubectl -n <kubeflow-namespace> get pods

# Show logs of Jupyter Notebook Server Container
$ kubectl -n <kubeflow-namespace> notebooks <pod-name> <notebook-name>

# Show logs of pod as it's launching
$ kubectl -n <kubeflow-namespace> describe notebooks <notebook-name>
Kubeflow Pipelines
As I mentioned earlier, I really like these but only once you’re quite late in the model development cycle (or your a BOSS). There are some good samples provided in the Kubeflow git repo . I was going to provide a detailed example but I ran out of time sooooo, sorry-no-sorry.
Kubeflow Notebooks
Once up and running these are just regurar Jupyter Notebooks, and making a custom Docker Image was not too hard either. I did spend a day or two trying to use a private image hosted on AWS ECR to work, but ended up just pushing it to GCR instead. This was really where the Logging really helped me.